©Candles in the Garden. Winnie and Walter November 2017 - Day 1

Winnie and Walter November Release – Day 1

Hey everyone!

Thanks for joining me at the start of November release week for Winnie & Walter! Today is the premiere of In a Word: Merry stamp set and co-ordinating Cutaways; In a Word: Holiday Tiles Cutaways and In a Word: Believe Cutaway Here’s my first card:

©Candles in the Garden. Winnie and Walter November 2017 - Day 1

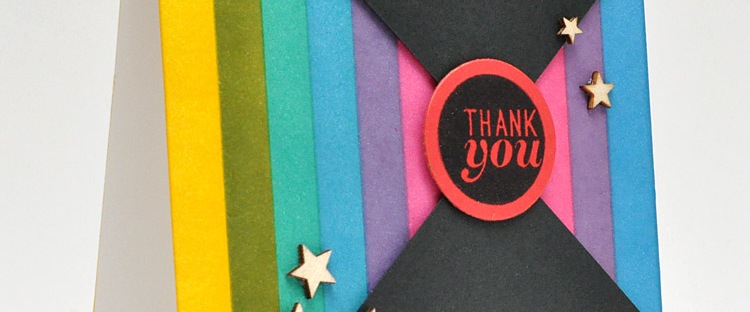
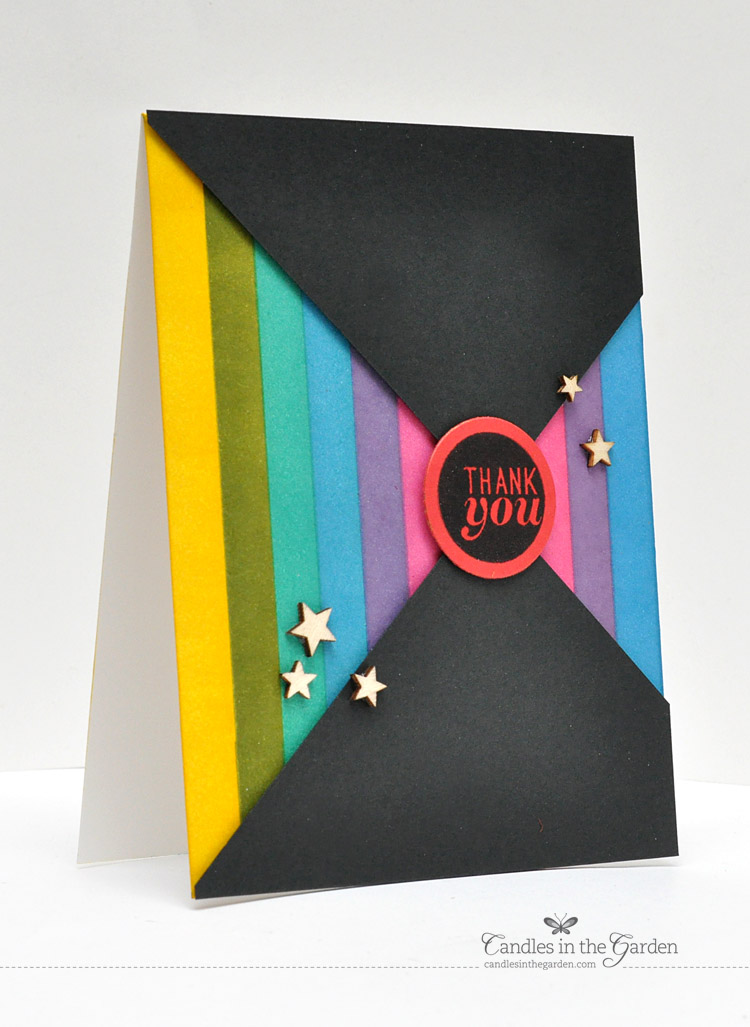
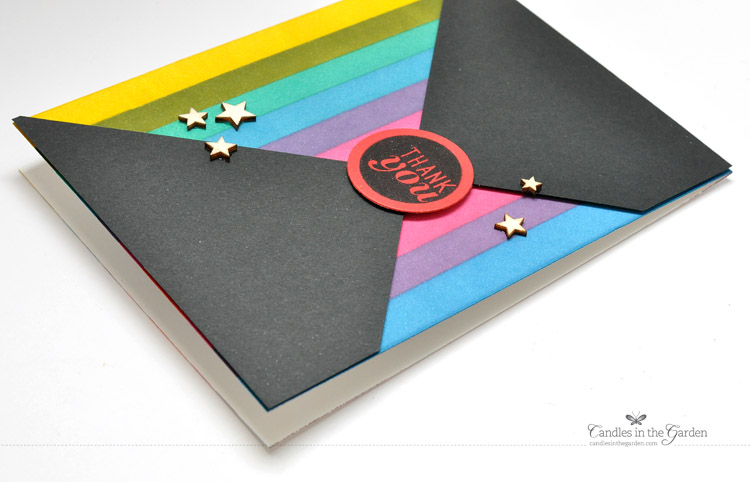
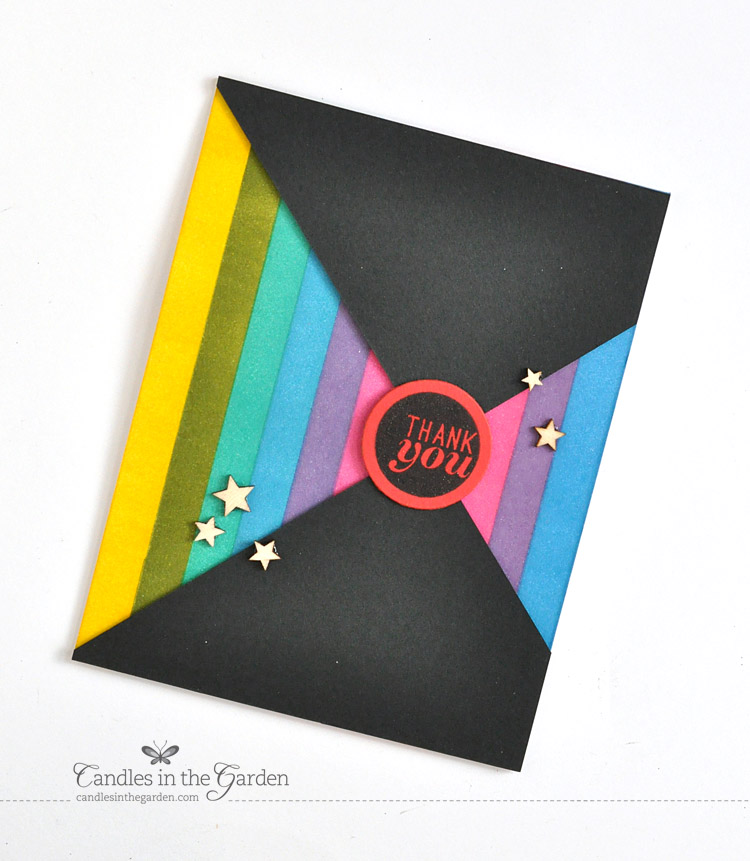
I began by stamping the largest sentiment from the In a Word: Merry stamp set with a range of dye inks using my MISTI onto a panel of white cardstock, and then going over the stamped area with a smaller sentiment from the same set with black ink.

©Candles in the Garden. Winnie and Walter November 2017 - Day 1

I trimmed the panel down at an angle and set aside to work on the kraft card base. I stamped some of the small star images from In a Word: Merry stamp set with Versamark ink and brush over some gold Perfect Pearls before foam mounting the trimmed focal panel.

©Candles in the Garden. Winnie and Walter November 2017 - Day 1

To finish, I stamped a smaller sentiment onto a strip of black cardstock with Versamark and again brushed over the gold Perfect Pearls. I foam mounted to the card front and adhered some wood veneer stars.

©Candles in the Garden. Winnie and Walter November 2017 - Day 1

Here’s my second card:

©Candles in the Garden. Winnie and Walter November 2017 - Day 1

I stamped the larger sentiments from In a Word: Merry stamp set with white pigment ink onto a panel of kraft cardstock and then stamped over the white ink with coloured dye inks, slightly offset.

©Candles in the Garden. Winnie and Walter November 2017 - Day 1

I also repeated the process with some of the smaller images from the set in the gaps to create a more finished panel.

©Candles in the Garden. Winnie and Walter November 2017 - Day 1

I trimmed the kraft panel down and foam mounted it to a white card base. I heat embossed the smaller sentiment in white onto strips of navy cardstock and then foam mounting them to the card front.

©Candles in the Garden. Winnie and Walter November 2017 - Day 1

To finish, I adhered some wood veneer and cork stars.

Pop by the Winnie & Walter Blog for giveaways and links to lots of gorgeous projects from the rest of the Design Team members!

Thanks for stopping by 😉

©Candles in the Garden. Winnie and Walter Jan / Feb 2017 Release / Day 3

Winnie and Walter January / February Release, Day 3

Hello, hello! It’s the third day of the Winnie & Walter January / February release, and you’re in for another treat!

Day 3 is for the premiere of Big Hugs with Evelin T Designs stamps and cutaways, and Sketchy Thoughts stamps and cutaways – here’s my card:

©Candles in the Garden. Winnie and Walter Jan / Feb 2017 Release / Day 3

I stamped the various speech bubbles from the Sketchy Thoughts set with Distress Inks and then stamped some co-ordinating sentiments from the same set, but with Versafine Onyx Black Ink.

©Candles in the Garden. Winnie and Walter Jan / Feb 2017 Release / Day 3

The stamped panel was then trimmed down to slightly smaller than my card base and foam mounted to the front.

©Candles in the Garden. Winnie and Walter Jan / Feb 2017 Release / Day 3

For a bit of interest, I added some cork and wood embellishments along with a sprinkling of sequins.

©Candles in the Garden. Winnie and Walter Jan / Feb 2017 Release / Day 3

Don’t forget to check out the projects from Julie on the Winnie & Walter blog, along with the rest of the Winnie & Walter talent. The new release will be available at 22.00 CST on Friday, 3rd of February!

Thanks for stopping by 😉

©Candles in the Garden. RIC82 - Distress Inked panel, die-cut floral from Memory Box and Gold Perfect Pearls on Vellum.

Runway Inspired Challenge #82

Hello there and welcome to this week’s Runway Inspired Challenge! We have another awesome inspiration photo and the chance to win a prize from Ellen Hutson.

ONP_4323
ric#82

Here’s my card:

©Candles in the Garden. RIC82 - Distress Inked panel, die-cut floral from Memory Box and Gold Perfect Pearls on Vellum.

I began by creating an inky panel using Distress Inks to emulate the background behind the model. I took Tumbled Glass, Chipped Sapphire and Salty Ocean Inks and smooshed them onto a craft mat, spritzed with water and laid down a piece of white cardstock into the puddles.

©Candles in the Garden. RIC82 - Distress Inked panel, die-cut floral from Memory Box and Gold Perfect Pearls on Vellum.

I lifted the panel out, heat set and repeated the process until I’d reached the desired effect. Once dry, I die-cut a rectangle out using the smaller frame from Avery Elle’s Finished Frames. I added a few ink splats onto a white card base using a mixture of Tarnish Brass Distress Stain and Delicata Golden Glitz ink.

©Candles in the Garden. RIC82 - Distress Inked panel, die-cut floral from Memory Box and Gold Perfect Pearls on Vellum.

I foam mounted the blue inky panel to the card base once the ink splats had dried and then die-cut the Memory Box Bella Bouquet floral cluster from some black cardstock. This delicate piece was adhered to the inky panel with a few small dots of Glossy Accents.

©Candles in the Garden. RIC82 - Distress Inked panel, die-cut floral from Memory Box and Gold Perfect Pearls on Vellum.

On a scrap piece of vellum, I stamped a sentiment from Waffle Flower’s Bowtiful set with Delicata Golden Glitz ink, and then pounced some Gold Perfect Pearls onto the area while the ink was still wet. I brushed away the excess powder and set with a fine misting of water. This enhanced the look of the gold ink.

©Candles in the Garden. RIC82 - Distress Inked panel, die-cut floral from Memory Box and Gold Perfect Pearls on Vellum.

I attached the vellum to the panel with a few dots of Glossy Accents. I then adhered some wood veneer stars to cover the spots where the glue was starting to show through. The wood veneer was first dipped into the Delicata Golden Glitz ink pad and then into the Gold Perfect pearls. Again, this was set with water.

Be sure to stop by the Runway Inspired Challenge blog for more inspiration from the rest of the DT members!

Jennifer | Taheerah | Kristen | Aga | Tasnim | Gayatri | Lindsay | Karolyn

Thanks for stopping by!

©Candles in the Garden. Neat and Tangled collaboration with The Cut Shoppe.

Neat and Tangled collaborates with The Cut Shoppe

Hey there,

Just popping by to share a couple of cards for the Neat & Tangled collaboration with The Cut Shoppe and their awesome range of cut files. I made two cards, each using a different cut file and combining it with some Neat and Tangled stamps – here’s the first:

©Candles in the Garden. Neat and Tangled collaboration with The Cut Shoppe.

I began by layering a piece of pattern paper with a piece of vellum – I’d stamped the Time Warp image onto the vellum with Delicata Golden Glitz ink. To make the gold stand out a little more, I brushed over it with Gold Perfect Pearls and misted lightly with water to set.

©Candles in the Garden. Neat and Tangled collaboration with The Cut Shoppe.

The star cut file was die-cut on my Silhouette Cameo out of cardstock, spritzed with some bright Dylusions ink sprays and adhered to one side of the paper layers. I added a wood veneer embellishment for a bit of interest too.

©Candles in the Garden. Neat and Tangled collaboration with The Cut Shoppe.

The sentiment comes from Gifts for You and was stamped onto a scrap piece of pattern paper and heat embossed in gold. This was also adhered to the vellum along with a few sequins before foam mounting to the card base. Here’s the second card:

©Candles in the Garden. Neat and Tangled collaboration with The Cut Shoppe.

I began by die-cutting the leaves on my Cameo out of some lightweight pearlescent paper and again spritzing with some Dylusions sprays. I heat set and then trimmed a section of this down to fit the front of a card, and adhered with dots of Glossy Accents.

©Candles in the Garden. Neat and Tangled collaboration with The Cut Shoppe.

The sentiment comes from the Dala Horse stamp set and was heat embossed in white on black cardstock. I trimmed it down roughly and foam mounted to the card front.

©Candles in the Garden. Neat and Tangled collaboration with The Cut Shoppe.

I finished up with a scattering of sequins! Be sure to stop by the Neat & Tangled and Cut Shoppe blogs for more inspiration!

Thanks for looking 😉

©Candles in the Garden. Winnie & Walter - A Week to Die For. The Big, The Bold and Party Cutaways.

Winnie & Walter – A Week to Die For – Day 1

Hello!

Thanks for joining me for Winnie & Walter’s A Week to Die For, where the DT are showcasing the dies that came out from the January Release!

A_Week_To_Die_For

Day 1 is for The Big, the Bold and Party and The Big, the Bold and You cutaways – I chose to play experiment with a partial die-cutting technique. Here’s my card:

©Candles in the Garden. Winnie & Walter - A Week to Die For. The Big, The Bold and Party Cutaways.

You may recognise the brightly coloured rings in the background from this card. I tellya, I had so many die-cut circles left over from that card! I chose to use some of them up by adhering them straight down on to a card base, and trimming off the excess.

©Candles in the Garden. Winnie & Walter - A Week to Die For. The Big, The Bold and Party Cutaways.

On a separate panel of white cardstock, I partially die-cut the ‘celebrate’ sentiment and foam mounted it to the card front. Here’s a close-up:

©Candles in the Garden. Winnie & Walter - A Week to Die For. The Big, The Bold and Party Cutaways.

I did have to practice a little to ensure I wasn’t die-cutting the sentiment out completely, but the end result is definitely worth it!

©Candles in the Garden. Winnie & Walter - A Week to Die For. The Big, The Bold and Party Cutaways.

I also think you could create a card set from this concept just by changing up the background – doesn’t necessarily have to be inlaid die-cut circles, could just be pattern paper, or Distress Ink blending…so many ideas!

©Candles in the Garden. Winnie & Walter - A Week to Die For. The Big, The Bold and Party Cutaways.

To finish, I added a couple of sequins and some wood veneer stars.

Be sure check out projects from Julie and Shay on the Winnie & Walter blog, along with the rest of the Winnie & Walter talent.

Thanks for stopping by!

©Candles in the Garden. RIC78 - Inlaid die-cutting with CAS-ual Fridays Heartboard Fri-Dies.

Runway Inspired Challenge #78

Hello there and welcome to this week’s Runway Inspired Challenge! We have another awesome inspiration photo and the chance to win a prize from Ellen Hutson.

KIM_0819
ric#78

Here’s my card:

©Candles in the Garden. RIC78 - Inlaid die-cutting with CAS-ual Fridays Heartboard Fri-Dies.

It took me a while to crack this one…I liked the diagonal stripes on the model’s outfit, but was really struggling with the colour – is it red? Is it orange? I went for both, just to be on the safe side 😉

©Candles in the Garden. RIC78 - Inlaid die-cutting with CAS-ual Fridays Heartboard Fri-Dies.

I pulled out one of my favourite dies – the Heart Board Fri-Dies from CAS-ual Fridays – and used it to die-cut several (more like hundreds!) of hearts out of five shades of paper, ranging from a red foil cardstock through to an orange, and finally white. I separated all the die-cut pieces and put them into piles on my desk, before inlaying them back together again in a multicoloured order. Here’s a closeup:

©Candles in the Garden. RIC78 - Inlaid die-cutting with CAS-ual Fridays Heartboard Fri-Dies.

I did this four times, adhering the inlaid hearts onto scraps of paper so that they would be easier to work with when mounting them to a piece of white cardstock. I arranged each fully composed heart in a sort of cross and then ran the whole thing through my die-cutting machine with a frame die from Avery Elle’s Finished Frames set.

©Candles in the Garden. RIC78 - Inlaid die-cutting with CAS-ual Fridays Heartboard Fri-Dies.

I foam mounted the panel to a card base on moved onto the sentiment…another stumbling block! I tried stacked sentiments, long sentiments, word dies…everything, before I ended up going with a really cute one from Mama Elephant’s Confetti set.

©Candles in the Garden. RIC78 - Inlaid die-cutting with CAS-ual Fridays Heartboard Fri-Dies.

I stamped the sentiment with black ink on to a matching piece of cardstock, trimmed it out with a circle die, and foam mounted it to the card front with a paisley wood veneer embellishment.

Be sure to stop by the Runway Inspired Challenge blog for more inspiration from the rest of the DT members!

Jennifer | Taheerah | Kristen | Aga | Tasnim | Gayatri | Lindsay | Karolyn

Thanks for stopping by!

©Candles in the Garden. RIC77 - Distress Ink Background, Neat and Tangled Sunburst and Doodlebug Sprinkles.

Runway Inspired Challenge #77

Hello there and welcome to this week’s Runway Inspired Challenge! We have another awesome inspiration photo and the chance to win a prize from Online Card Classes!

_UMB9565
ric#77

Here’s my card:

©Candles in the Garden. RIC77 - Distress Ink Background, Neat and Tangled Sunburst and Doodlebug Sprinkles.

I began by creating a panel using Tumbled Glass, Broken China, Black Soot, Pumice Stone and Mustard Seed Distress Inks – they were smooshed onto a craft mat and spritzed with water before I lay a piece of white cardstock into the inky puddles.

©Candles in the Garden. RIC77 - Distress Ink Background, Neat and Tangled Sunburst and Doodlebug Sprinkles.

I then inked up the Neat & Tangled Sunburst image with Black Soot and Pumice Stone, and stamped on top of the inky panel after it had dried. I thought the sunburst stripes echoed the ones on the model’s dress 😉

©Candles in the Garden. RIC77 - Distress Ink Background, Neat and Tangled Sunburst and Doodlebug Sprinkles.

I trimmed the inky panel and a co-ordinating piece of pattern paper down using the smaller frame die from Avery Elle’s Finished Frames ELLE-ments set. These were adhered together at a jaunty angle and foam mounted to a white card base.

©Candles in the Garden. RIC77 - Distress Ink Background, Neat and Tangled Sunburst and Doodlebug Sprinkles.

Behind the Studio Calico wood veneer sentiment is a vellum die-cut created with WPlus9’s Quilt Cuts 1 set and some balled up, black thread, all adhered with glue dots.

©Candles in the Garden. RIC77 - Distress Ink Background, Neat and Tangled Sunburst and Doodlebug Sprinkles.

To finish, I added some Doodlebug sprinkles 😉

Be sure to stop by the Runway Inspired Challenge blog for more inspiration from the rest of the DT members!

Jennifer | Taheerah | Kristen | Aga | Tasnim | Gayatri | Lindsay | Karolyn

Thanks for stopping by!

©Candles in the Garden. Neat and Tangled JAN15 Release - Day 2. Out of the Box.

Neat & Tangled January Release, Day 2: Out of the Box

Hello again!

Time to showcase some more goodies from the Neat & Tangled January Release!

NT Release Graphic.jpg

Day 2 is for the coordinating Out of the Box stamp set and die, along with the Origami Map die – these Nice and Neat Dies are totally awesome!

Print DIESinsert DIESinsert

Here’s my first card:

©Candles in the Garden. Neat and Tangled JAN15 Release - Day 2. Out of the Box.

The Out of the Box die is so clever because you end up with a 3D style box that lays flat! I made one up out of pattern paper – its worth spending a bit of time choosing one that will work really well for this sort of thing – I went with a double sided one that was plain on one side and patterned on the reverse.

©Candles in the Garden. Neat and Tangled JAN15 Release - Day 2. Out of the Box.

I foam mounted the box to a card base and stamped a sentiment from the Out of the Box set below it with black ink. Then I used the two heart dies from My Plate is Full to die-cut lots of different coloured hearts and filled the box with them!

©Candles in the Garden. Neat and Tangled JAN15 Release - Day 2. Out of the Box.

To finish, I added some sequins from the Full of Love mix.

©Candles in the Garden. Neat and Tangled JAN15 Release - Day 2. Out of the Box.

Here’s my second card, this time using the Origami Map die:

©Candles in the Garden. Neat and Tangled JAN15 Release - Day 2. Origami Map Die.

A really quick and simple card – I simply die-cut the map out of different coloured cardstock and adhered them together slightly offset from each other. The top layer is from white cardstock for a bit of contrast.

©Candles in the Garden. Neat and Tangled JAN15 Release - Day 2. Origami Map Die.

I adhered the layered piece onto a pearlescent grey card base. The sentiment comes from the Origami Map set and was stamped onto black card with Versamark ink and heat set with white embossing powder. This was cut down to a strip and foam mounted to the card front.

©Candles in the Garden. Neat and Tangled JAN15 Release - Day 2. Origami Map Die.

I wanted the map to be the focal element of this card so kept embellishments to a minimum by only adhering a few wood veneer stars. This card could be so easily replicated and mass produced – all you have to to is change up the sentiment!

©Candles in the Garden. Neat and Tangled JAN15 Release - Day 2. Origami Map Die.

Be sure to check out the Neat & Tangled Blog to see what the rest of the DT has created – there’s one large giveaway of all the stamp sets and sequins (not including dies) to be chosen from comments all through the week. All the sets that we are showcasing this week will be released on Friday, 16 January at 8am EST in the shop!

Thanks for stopping by 😉

©Candles in the Garden. RIC74. Inlaid die-cutting and embellished butterfly (Wink of Stella and Glossy Accents).

Runway Inspired Challenge #74

Hello there and welcome to this week’s Runway Inspired Challenge! We have another awesome inspiration photo and the chance to win a prize from Ellen Hutson.

Escada_020_1366
ric#74

I had so many ideas for this one (watercolour, distress inks, colour blocking) but decided to go with some heat embossing / resist. Here’s my card:

©Candles in the Garden. RIC74. Inlaid die-cutting and embellished butterfly (Wink of Stella and Glossy Accents).

I began by stamping the various doily images from WPlus9’s Damask Doilies set onto a piece of white cardstock with Versamark Ink. I sprinkled with white embossing powder and heat set.

©Candles in the Garden. RIC74. Inlaid die-cutting and embellished butterfly (Wink of Stella and Glossy Accents).

I then made a few puddles of ink on my craft mat with Spiced Marmalade and Wild Honey Distress Inks, spritzed with water and laid the embossed cardstock into it. I repeated this process until the non-heat embossed areas were saturated with colour.

©Candles in the Garden. RIC74. Inlaid die-cutting and embellished butterfly (Wink of Stella and Glossy Accents).

Once the panel was dry, I sponged some Delicata Golden Glitz ink over the doilies for a bit of added sparkle (looks great in real life, but I couldn’t pick it up in my photos!). To clean up, I wiped off the excess ink from the embossed areas. I trimmed the panel at an angle and die-cut the word ‘Grateful’ using Penny Black’s Words of Gratitude.

©Candles in the Garden. RIC74. Inlaid die-cutting and embellished butterfly (Wink of Stella and Glossy Accents).

I used the same die to cut the word out of some brown shimmer cardstock a few times and adhered them together to create a thicker die-cut. The embossed / coloured panel was adhered straight down onto a white card base and then slotted the die-cut word into place.

©Candles in the Garden. RIC74. Inlaid die-cutting and embellished butterfly (Wink of Stella and Glossy Accents).

To finish up, I added a wood veneer butterfly, which was first coloured with co-ordinating Copic markers. I then went over it with some clear Wink of Stella before adding a generous amount of Glossy Accents. This gives you a really cute, epoxy resin like embellishment!

©Candles in the Garden. RIC74. Inlaid die-cutting and embellished butterfly (Wink of Stella and Glossy Accents).

Be sure to stop by the Runway Inspired Challenge blog for more inspiration from the rest of the DT members!

Jennifer | Taheerah | Kristen | Aga | Tasnim | Gayatri | Lindsay | Karolyn

Thanks for stopping by 😉

©Candles in the Garden. RIC73. Masking and colouring with Distress Inks.

Runway Inspired Challenge #73

Hello there and welcome to this week’s Runway Inspired Challenge! We have another awesome inspiration photo and the chance to win a prize from Butterfly Reflections.

_MON1106
ric#73

Here’s my card:

©Candles in the Garden. RIC73. Masking and colouring with Distress Inks.

I was totally inspired by the graphic style of the dress and knew I wanted to reflect that somehow on my card – of course, there are a dozen different ways that you can interpret this, but I went back to my trusty Distress Inks to create a striped background on a white card base.

©Candles in the Garden. RIC73. Masking and colouring with Distress Inks.

This was achieved by masking off areas on the card with postit notes and then sponging various colours of Distress Inks onto the exposed areas. I wanted to be quite precise about how I did this so measured equally across the top and bottom roughly 3/8 of an inch apart for each stripe.

©Candles in the Garden. RIC73. Masking and colouring with Distress Inks.

Once I’d laid down all the colours, I lightly spritzed with a Perfect Pearl mist and set aside to dry. I made a mark in the middle of one of the stripes and used it as a guide to line some black cardstock up to the edges of the card. This gave me two bold, angled pieces of card which I foam mounted to the card base.

©Candles in the Garden. RIC73. Masking and colouring with Distress Inks.

I took a sentiment from Mama Elephant’s Many Thanks set and stamped it onto some red cardstock with black ink. I used a circle die to cut it out and foam mounted it above the area where the two corners of the black card meet.

©Candles in the Garden. RIC73. Masking and colouring with Distress Inks.

To finish, I scattered a couple of wood veneer stars to break up all those straight lines.

Be sure to stop by the Runway Inspired Challenge blog for more inspiration from the rest of the DT members!

Jennifer | Taheerah | Kristen | Aga | Tasnim | Gayatri | Lindsay | Karolyn