Neat & Tangled November Release Review

Hi there! Just popping by to let you all know that the Neat & Tangled November release is now available from Neat & Tangled!

And here’s a reminder of some of the cards I created with this release:

Day 1

©Candles in the Garden. Neat and Tangled November 2018 Release. Triangle Box Dies.

Day 2

©Candles in the Garden. Neat and Tangled November 2018 Release. Fa La La Stencil

Day 3

©Candles in the Garden. Neat and Tangled November 2018 Release. Stay Cool

Day 4

©Candles in the Garden. Neat and Tangled November 2018 Release. Falling Stars.

Do stop by the Neat & Tangled blog for more inspiration and shop if you’d like to purchase any of the products from the November release!

🙂

©Candles in the Garden. Neat and Tangled November 2018 Release. Triangle Box Dies.

Neat & Tangled November Release, Day 1

Hello everyone!

Welcome to the start of November release week for Neat & Tangled!

NT Release Graphic.jpg

Day 1 is for the Triangle Box Dies  and Gift Card Box Christmas Sentiments – here’s my card:

©Candles in the Garden. Neat and Tangled November 2018 Release. Triangle Box Dies.

I had so much fun playing with the Triangle Box Dies, but knew that I only wanted to use the different sized triangle dies for my card. This is a very graphic, clean and simple card and you can easily use up your pattern paper scraps to create a whole card set if you like!

©Candles in the Garden. Neat and Tangled November 2018 Release. Triangle Box Dies.

I hunted round for some inky scraps along with a sheet of metallic grey cardstock and used the dies to die-cut the triangles. I looked on Pinterest for some inspiration to help me come up with a layout for my triangle cluster, and simply adhered some straight down onto my card base, while foam mounting others.

©Candles in the Garden. Neat and Tangled November 2018 Release. Triangle Box Dies.

I then stamped a sentiment from the Gift Card Box Christmas Sentiments set with Versamark Onyx Black ink.

©Candles in the Garden. Neat and Tangled November 2018 Release. Triangle Box Dies.

To finish, I added some sequins.

Pop by the Neat & Tangled blog to see what the rest of the DT has created – all the sets that we are showcasing this week will be released on Friday, 9 November at 8am EST in the shop!

Thanks for stopping by 😉

©Candles in the Garden. Neat and Tangled AUGUST 2018

Hello!

Hello there!

I’m over at the Neat & Tangled blog today to sharing a card using the Thanks So Much and Floral Frame stamp sets!

©Candles in the Garden. Neat and Tangled AUGUST 2018

This card was so simple to create, and used one stamp from each set. I took the outline diamond shape from Thanks So Much and stamped it repeatedly with Versamark ink onto a panel of white cardstock. I sprinkled with white embossing powder and heat set.

©Candles in the Garden. Neat and Tangled AUGUST 2018

I then took one of the smaller images from the set and stamped in the corners of the diamond shapes, again with Versamark ink and heat set in white.

©Candles in the Garden. Neat and Tangled AUGUST 2018

I grabbed my Zig Clean Color Real Brush Pens and scribbled roughly with rainbow colours inside each of the embossed areas. I then spritzed the panel with water and watched the colours beautifully bleed into one another, and again heat set.

©Candles in the Garden. Neat and Tangled AUGUST 2018

I trimmed the panel down to slightly smaller than my card base and foam mounted to the card front. I stamped a sentiment from the Floral Frame set onto a strip of black card stock, heat embossed in white, trimmed down and foam mounted to the card front.

©Candles in the Garden. Neat and Tangled AUGUST 2018

To finish, I adhered some gold sequins.

Thanks for stopping by!

©Candles in the Garden. May 2016 Neat and Tangled post. Hexastar Stencil and Perfect Pearls.
©Candles in the Garden. Neat and Tangled JUNE 2018

Stencilling on YUPO

Hello there!

I’m over at the Neat & Tangled blog today to sharing another card using the Geometric Circles stencil and the So Many Sentiments stamp set 😉

©Candles in the Garden. Neat and Tangled JUNE 2018

I began by creating a background panel using YUPO paper and the Geometric Circles stencil. I dropped different colours inks and paints onto the paper before laying down the stencil and adding further colour.

©Candles in the Garden. Neat and Tangled JUNE 2018

I chose to leave the stencil there instead of heat setting the YUPO paper as I didn’t want it to curl up. I left it overnight to dry and then removed the stencil to reveal the gorgeous pattern on the paper. I trimmed the stencilled background panel down to slightly smaller than my card base and adhered it straight down to a white card base.

©Candles in the Garden. Neat and Tangled JUNE 2018

I then stamped a bunch of sentiments from the So Many Sentiments set onto strips of black cardstock, sprinkled with white embossing powder and heat set. I then foam mounted them to the card front.

©Candles in the Garden. Neat and Tangled JUNE 2018

To finish off, I adhered a some sequins and wood veneer embellishments.

©Candles in the Garden. Neat and Tangled JUNE 2018

Thanks for stopping by!

©Candles in the Garden. May 2016 Neat and Tangled post. Hexastar Stencil and Perfect Pearls.
©Candles in the Garden. Neat and Tangled June 2018 Release. So Fly

Neat & Tangled June Release Review

Hi there! Just popping by to let you all know that the Neat & Tangled June release is now available from Neat & Tangled!

And here’s a reminder of some of the cards I created with this release:

Day1

©Candles in the Garden. Neat and Tangled June 2018 Release. So Fly

Day 2

©Candles in the Garden. Neat and Tangled June 2018 Release. Clearly Canine

Day 3

©Candles in the Garden. Neat and Tangled June 2018 Release. Magnolia

Day 4

©Candles in the Garden. Neat and Tangled June 2018 Release. Receding Blocks Stencil

Do stop by the Neat & Tangled blog for more inspiration and shop if you’d like to purchase any of the products from the June release!

🙂

©Candles in the Garden. Neat and Tangled June 2018 Release. Receding Blocks Stencil

Neat & Tangled June Release, Day 4

Hello there!

Today is the fourth day of the June release from Neat & Tangled, and its a beauty!

NT Release Graphic.jpg

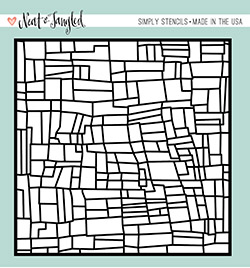
Day 4 is for the Receding Blocks Coverplate and Stencil – I chose to play with the stencil using one of my favourite techniques:

©Candles in the Garden. Neat and Tangled June 2018 Release. Receding Blocks Stencil

I really enjoy creating vibrant background using Dylusions Ink Sprays and stencils. The Receding Blocks Stencil is delicate and there are a lot more open areas for the ink to emerge through the stencil, but the end result is still striking!

©Candles in the Garden. Neat and Tangled June 2018 Release. Receding Blocks Stencil

I began by adding  droplets of pink and green Dylusions ink sprays onto a large acrylic block, then heavily spritzed a piece of watercolour cardstock with water. Whilst the panel was wet, I laid the stencil on top, then flipped the acrylic block on top very quickly, allowing the ink to seep through to the damp watercolour panel.

©Candles in the Garden. Neat and Tangled June 2018 Release. Receding Blocks Stencil

Whilst the stencil was still in place, I decided to add a few drops of Schmincke Aqua Shine to the panel. I then removed the stencil and quickly heat set the panel to try to stop the ink from moving around too much.

©Candles in the Garden. Neat and Tangled June 2018 Release. Receding Blocks Stencil

I trimmed the panel down and adhered it to a white card base. For a bit of detail, I used the Hooray die to die-cut a wreath from a piece of vellum – I delicately removed the actual word from the die-cut piece so that I was left with just the wreath, which I adhered with some tiny drops of glue to the card front.

©Candles in the Garden. Neat and Tangled June 2018 Release. Receding Blocks Stencil

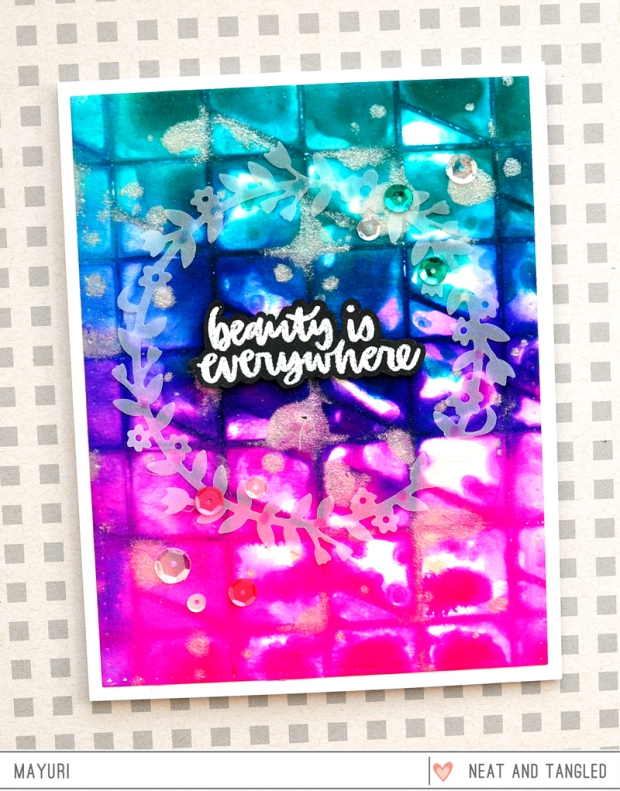
I stamped a sentiment from the Magnolia stamp set onto a piece of black cardstock with Versamark ink, sprinkled with white embossing powder and heat set. I fussy cut the sentiment out and foam mounted it to the card front. To finish off, I added a mixture of sequins!

I hope you’re enjoying the June Release so far! Be sure to visit the Neat & Tangled Blog to see what the rest of the DT has created – all the sets that we are showcasing this week will be released on Friday, 8 June at 8am EST in the shop!

Thanks for looking 😉

©Candles in the Garden. Neat and Tangled May 2018 Release. Hello Summer

Neat & Tangled May Release Review

Hi there! Just popping by to let you all know that the Neat & Tangled May release is now available from Neat & Tangled!

And here’s a reminder of some of the cards I created with this release:

Day 1

©Candles in the Garden. Neat and Tangled May 2018 Release. Hello Summer

Day 2

©Candles in the Garden. Neat and Tangled May 2018 Release. Paint Night

Day 3

©Candles in the Garden. Neat and Tangled May 2018 Release. Layered Landscapes

Day 4

©Candles in the Garden. Neat and Tangled May 2018 Release. Dimensional Triangle Coverplate

Do stop by the Neat & Tangled blog for more inspiration and shop if you’d like to purchase any of the products from the May release!

🙂

©Candles in the Garden. Neat and Tangled April 2018 Release. Have Courage

Neat & Tangled April Release Review

Hi there! Just popping by to let you all know that the Neat & Tangled April release is now available from Neat & Tangled!

And here’s a reminder of some of the cards I created with this release:

Day 1

©Candles in the Garden. Neat and Tangled April 2018 Release. Have Courage

Day 2

©Candles in the Garden. Neat and Tangled April 2018 Release. Mommy Daddy and Me

Day 3

©Candles in the Garden. Neat and Tangled April 2018 Release. Happiness

Day 4

©Candles in the Garden. Neat and Tangled April 2018 Release. Inlaid Squares Cover Plate

Do stop by the Neat & Tangled blog for more inspiration and shop if you’d like to purchase any of the products from the April release!

🙂

©Candles in the Garden. Neat and Tangled April 2018 Release. Have Courage

Neat & Tangled April Release, Day 1: Have Courage

Hello everyone!

Welcome to the start of April release week for Neat & Tangled!

NT Release Graphic.jpg

Day 1 is for a stamp set with lovely ginko leaf images and co-ordinating sentiments – Have Courage – here’s my card:

©Candles in the Garden. Neat and Tangled April 2018 Release. Have Courage

I began by creating the watercolour style background using all the solid ginko leaf images from the set. I took a piece of watercolour paper and stamped the images repeatedly with Dylusions ink sprays, making sure to overlap some impressions.

©Candles in the Garden. Neat and Tangled April 2018 Release. Have Courage

I applied the ink using the applicator from the bottle, and swiping it across the stamp. I dampened the part of the watercolour panel that I was going to stamp on with a bit of water first, and then stamped the image – this gave me lovely results, as I wasn’t looking for a clean, sharp impression.

©Candles in the Garden. Neat and Tangled April 2018 Release. Have Courage

I heat set the stamped ginko leaf panel and then added detail with a black fine line marker. I also added flicked on small dots of gold paint and then heat set once more. I trimmed the panel down to slightly smaller than my card base and foam mounted to the front.

©Candles in the Garden. Neat and Tangled April 2018 Release. Have Courage

I stamped a sentiment from the set onto a strip of black cardstock with Versamark, sprinkled with white embossing powder and heat set.

©Candles in the Garden. Neat and Tangled April 2018 Release. Have Courage

I foam mounted the sentiment strip to the card front and tucked in a few yellow and green sequins.

Pop by the Neat & Tangled Blog to see what the rest of the DT has created – all the sets that we are showcasing this week will be released on Friday, 6 April at 8am EST in the shop!

Thanks for stopping by 😉

©Candles in the Garden. Neat and Tangled March 2018

I Miss You Every Day

Hello there!

I’m over at the Neat & Tangled blog today to share a card using the Friendly Florals and So Many Sentiments stamp sets 😉

©Candles in the Garden. Neat and Tangled March 2018

I began by taking the largest floral cluster from the Friendly Florals set, flipping it over and stamping with the back of the stamp onto a piece of white cardstock with some yellow dye inks.

©Candles in the Garden. Neat and Tangled March 2018

I cleaned up the stamp, flipped it back the right way round and stamped the outline image straight on top of the coloured areas. I then filled in some areas of the pattern that I’d made with gold paints and a black marker.

©Candles in the Garden. Neat and Tangled March 2018

I added detail to some of the larger florals with small dots of paint and flicked some gold and black ink splats onto the cardstock panel. I heat set the panel and trimmed it down to slightly smaller than my white card base.

©Candles in the Garden. Neat and Tangled March 2018

I foam mounted the panel to the card base and moved onto the sentiment, which comes from the So Many Sentiments set. I white heat embossed this onto a strip of black cardstock and foam mounted to the card front.

©Candles in the Garden. Neat and Tangled March 2018

To finish, I added some gold sequins 😉

Thanks for stopping by!

©Candles in the Garden. May 2016 Neat and Tangled post. Hexastar Stencil and Perfect Pearls.