Neat & Tangled November Release Review

Hi there! Just popping by to let you all know that the Neat & Tangled November release is now available from Neat & Tangled!

And here’s a reminder of some of the cards I created with this release:

Day 1

©Candles in the Garden. Neat and Tangled November 2018 Release. Triangle Box Dies.

Day 2

©Candles in the Garden. Neat and Tangled November 2018 Release. Fa La La Stencil

Day 3

©Candles in the Garden. Neat and Tangled November 2018 Release. Stay Cool

Day 4

©Candles in the Garden. Neat and Tangled November 2018 Release. Falling Stars.

Do stop by the Neat & Tangled blog for more inspiration and shop if you’d like to purchase any of the products from the November release!

🙂

©Candles in the Garden. Neat and Tangled November 2018 Release. Stay Cool

Neat & Tangled November Release, Day 3

Hello, hello!

It’s the third day of the Neat & Tangled November release, and we are showcasing another fabulous stamp set!

NT Release Graphic.jpg

Day 3 is for the Stay Cool stamp set – here’s my card:

©Candles in the Garden. Neat and Tangled November 2018 Release. Stay Cool

I knew I wanted a textured background for the cute little character from the set to sit against and found one from my stash of inky background panels – I had used the Parquet stencil to swipe through some embossing paste onto a panel of white cardstock and added a bit of colour for interest before trimming it down to slightly smaller than my card base and adhering it straight down.

©Candles in the Garden. Neat and Tangled November 2018 Release. Stay Cool

I then stamped the little character onto another piece of white cardstock with Versafine Onyx Black ink and coloured her in with ZIG Clean Color Real Brush pens. I used the co-ordinating die to die-cut her out along with the little fish from the set.

©Candles in the Garden. Neat and Tangled November 2018 Release. Stay Cool

I freehand drew a snow hill onto another piece of white cardstock and cut it out. I used Tumbled Glass Distress Ink to add a bit of colour along the top of the hill and then stamped a couple of sentiments from the set. I coloured in the ‘COOL’ again with my ZIG Clean Color Real Brush Pens before foam mounting to the card front.

©Candles in the Garden. Neat and Tangled November 2018 Release. Stay Cool

I then foam mounted the little girl and fish to the card front to finish off!

Pop by the Neat & Tangled blog to see what the rest of the DT has created – all the sets that we are showcasing this week will be available in the shop from Friday, 9 November at 8am EST!

Thanks for looking 🙂

©Candles in the Garden. Neat and Tangled May 2018 Release. Hello Summer

Neat & Tangled May Release Review

Hi there! Just popping by to let you all know that the Neat & Tangled May release is now available from Neat & Tangled!

And here’s a reminder of some of the cards I created with this release:

Day 1

©Candles in the Garden. Neat and Tangled May 2018 Release. Hello Summer

Day 2

©Candles in the Garden. Neat and Tangled May 2018 Release. Paint Night

Day 3

©Candles in the Garden. Neat and Tangled May 2018 Release. Layered Landscapes

Day 4

©Candles in the Garden. Neat and Tangled May 2018 Release. Dimensional Triangle Coverplate

Do stop by the Neat & Tangled blog for more inspiration and shop if you’d like to purchase any of the products from the May release!

🙂

©Candles in the Garden. Neat and Tangled May 2018 Release. Layered Landscapes

Neat & Tangled May Release, Day 3: Layered Landscapes

Hello, hello!

It’s the third day of the Neat & Tangled May release, and we are showcasing another fabulous stamp set!

NT Release Graphic.jpg

Day 3 is for the Layered Landscapes stamp set – here’s my card:

©Candles in the Garden. Neat and Tangled May 2018 Release. Layered Landscapes

There are so many ways to use this stamp set, but I gravitated back towards my rainbow range of Distress Inks and stamped the mountains randomly across an imaginary horizon on a panel of white cardstock – I made sure to overlap the colours for more variation.

©Candles in the Garden. Neat and Tangled May 2018 Release. Layered Landscapes

I loosely watercoloured a sky behind the colourful mountains and a deep blue sea underneath them. I then restamped the reflections of the mountains in the sea area followed by some darker mountains in the foreground.

©Candles in the Garden. Neat and Tangled May 2018 Release. Layered Landscapes

I trimmed the panel down to slightly smaller than my card base and stamped part of the sentiment into the top right hand corner with Versafine Onyx Black ink. I then foam mounted the panel onto my card base.

©Candles in the Garden. Neat and Tangled May 2018 Release. Layered Landscapes

I stamped the rest of the sentiment onto a strip of black cardstock with Versamark, sprinkled white embossing powder and heat set. I foam mounted it just below the stamped sentiment.

©Candles in the Garden. Neat and Tangled May 2018 Release. Layered Landscapes

To finish, I adhered some gold sequins.

Pop by the Neat & Tangled Blog to see what the rest of the DT has created – all the sets that we are showcasing this week will be available in the shop from Friday, 11 May at 8am EST!

Thanks for looking 🙂

©Candles in the Garden. Neat and Tangled April 2018 Release. Have Courage

Neat & Tangled April Release Review

Hi there! Just popping by to let you all know that the Neat & Tangled April release is now available from Neat & Tangled!

And here’s a reminder of some of the cards I created with this release:

Day 1

©Candles in the Garden. Neat and Tangled April 2018 Release. Have Courage

Day 2

©Candles in the Garden. Neat and Tangled April 2018 Release. Mommy Daddy and Me

Day 3

©Candles in the Garden. Neat and Tangled April 2018 Release. Happiness

Day 4

©Candles in the Garden. Neat and Tangled April 2018 Release. Inlaid Squares Cover Plate

Do stop by the Neat & Tangled blog for more inspiration and shop if you’d like to purchase any of the products from the April release!

🙂

©Candles in the Garden. Neat and Tangled April 2018 Release. Mommy Daddy and Me

Neat & Tangled April Release, Day 2: Mommy, Daddy and Me

Hello again!

Time to showcase some more goodies from the Neat & Tangled April Release!

NT Release Graphic.jpg

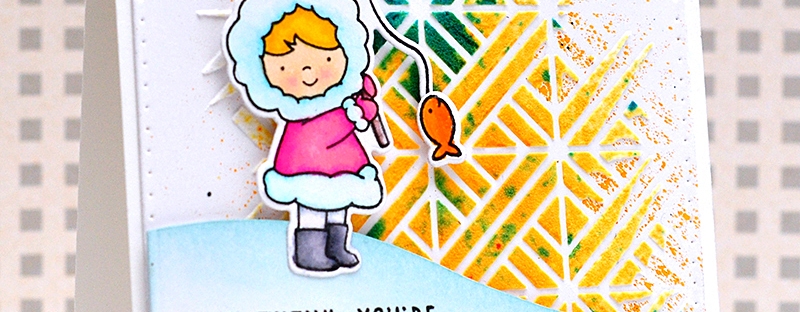
Day 2 is for the Mommy Daddy and Me stamp set – another staple for every crafter’s stash! Here’s my card:

©Candles in the Garden. Neat and Tangled April 2018 Release. Mommy Daddy and Me

The images from the set are so cute and easy to colour in, and when combined with one of the sentiments, makes such an awesome card! I began by creating a muted, coloured blended background using Tumbled Glass and Mowed Lawn Distress inks. Using a sponge applicator, I gently blended the two colours together on a piece of white cardstock.

©Candles in the Garden. Neat and Tangled April 2018 Release. Mommy Daddy and Me

I then flicked a few spots of gold paint onto the blended area and set aside to work on the focal critter image of the two bears. I stamped them onto a piece of white cardstock with Versafine Onyx Black ink and then coloured them in using ZIG Clean Color Real Brush Pens.

©Candles in the Garden. Neat and Tangled April 2018 Release. Mommy Daddy and Me

I fussy cut the stamped and coloured bears and set aside. I went back to the blended panel and die-cut an oval shape from the top part to allow for a sentiment to peek through when foam mounted to my card base.

©Candles in the Garden. Neat and Tangled April 2018 Release. Mommy Daddy and Me

Before foam mounting the die-cut piece in place, I stamped a sentiment in the spot where the aperture would be. I then foam mounted the coloured bears in place.

©Candles in the Garden. Neat and Tangled April 2018 Release. Mommy Daddy and Me

I added a couple of sequins to the design to finish off.

Be sure to check out the Neat & Tangled Blog to see what the rest of the DT has created – all the sets that we are showcasing this week will be released on Friday, 6 April at 8am EST in the shop!

Thanks for stopping by 😉

Neat & Tangled February Release, Day 4: S’more Fun

Hello, hello!

It’s the fourth day of the Neat & Tangled February release, and we are showcasing another cute stamp and die set!

NT Release Graphic.jpg

Day 4 is for the S’more Fun stamp set and dies – here’s my card:

©Candles in the Garden. Neat and Tangled February 2018 Release. S'more Fun

I began by creating a quick background by blending Picked Raspberry and Ripe Persimmon Distress Inks on a panel of white cardstock. I then flicked some water for a bit of interest.

©Candles in the Garden. Neat and Tangled February 2018 Release. S'more Fun

I used a paper towel to mop up any excess water and trimmed the panel down to slightly smaller than my card base before stamping a sentiment from the set.

©Candles in the Garden. Neat and Tangled February 2018 Release. S'more Fun

I foam mounted the panel to the white card base and then moved onto the focal element. I stamped the pair of crackers with Versafine Onyx Black ink onto a piece of white cardstock and then coloured them in with copics. I used the co-ordinating die to cut them out.

©Candles in the Garden. Neat and Tangled February 2018 Release. S'more Fun

I also ran the Interlocking Geo die through my die-cutting machine with some copper foil cardstock and trimmed a small portion of it to act as a layered piece for the crackers to sit on. I adhered the die-cut copper piece to the card front and then foam mounted the crackers on top.

©Candles in the Garden. Neat and Tangled February 2018 Release. S'more Fun

To finish up, I added a few sequins.

Pop by the Neat & Tangled Blog to see what the rest of the DT has created – all the sets that we are showcasing this week will be available in the shop from Friday, 9 February at 8am EST!

Thanks for looking 🙂

©Candles in the Garden. Neat and Tangled February 2018 Release. Ride With Me.

Neat & Tangled February Release, Day 1: Ride With Me

Hello everyone!

Welcome to the start of February release week for Neat & Tangled!

NT Release Graphic.jpg

Day 1 is for a lovely little stamp and die set called Ride With Me, which features some cute critters! Here’s my card:

©Candles in the Garden. Neat and Tangled February 2018 Release. Ride With Me.

I began by repeatedly stamping the bicycle image from the set onto my card base with Versafine Onyx Black ink, and then set it aside to work on the focal imagery.

©Candles in the Garden. Neat and Tangled February 2018 Release. Ride With Me.

I repeatedly stamped the pram image from the set onto a panel of white cardstock with Versamark ink, sprinkled with white embossing powder and heat set. I then blended various Distress Inks over the prams and die-cut each one out.

©Candles in the Garden. Neat and Tangled February 2018 Release. Ride With Me.

I cut out a piece of vellum that was slightly smaller than my card base and foam mounted the prams onto it. I also heat embossed a sentiment from the set onto a strip of black cardstock and foam mounted that to the vellum too. I then foam mounted the vellum to the card front, strategically placing the adhesive only behind the prams and sentiment strip.

©Candles in the Garden. Neat and Tangled February 2018 Release. Ride With Me.

To finish off, I also added some sequins.

©Candles in the Garden. Neat and Tangled February 2018 Release. Ride With Me.

Pop by the Neat & Tangled Blog to see what the rest of the DT has created – all the sets that we are showcasing this week will be released on Friday, 9 February at 8am EST in the shop!

Thanks for stopping by 😉

©Candles in the Garden. Neat and Tangled January 2018 Release. Beaver Eh? Stamp set and Die.

Neat & Tangled January Release, Day 2: Beaver Eh?

Hello again!

Time to showcase some more goodies from the Neat & Tangled January Release!

NT Release Graphic.jpg

Day 2 is for the Beaver Eh? stamp and co-ordinating die set – they are totally adorable! Here’s my card:

©Candles in the Garden. Neat and Tangled January 2018 Release. Beaver Eh? Stamp set and Die.

I did a bit of double partial die-cutting on this one, a technique I’ve used before on this card – the result is a single panel which has been created using two dies. I then stamped one of the beavers from the stamp set in place followed by a sentiment beneath him.

©Candles in the Garden. Neat and Tangled January 2018 Release. Beaver Eh? Stamp set and Die.

I coloured the beaver in with copic markers – I only have the set of 36 which seems to have enough of a range for me to colour him this way. I also stamped and coloured the little birdie from the set in the same way and set both pieces aside.

©Candles in the Garden. Neat and Tangled January 2018 Release. Beaver Eh? Stamp set and Die.

On the front of my white card base, I blended two shades of Distress Ink to create a background for the beaver to sit against. I also added a couple of droplets of water on the inky areas for some interest. Once I was happy, I foam mounted the beaver panel to the card base along with the bird die-cut.

©Candles in the Garden. Neat and Tangled January 2018 Release. Beaver Eh? Stamp set and Die.

At this point, I felt the card looked a little plain, so I added a few sequins from the Jewel Tones sequins mix.

©Candles in the Garden. Neat and Tangled January 2018 Release. Beaver Eh? Stamp set and Die.

Be sure to check out the Neat & Tangled Blog to see what the rest of the DT has created – all the sets that we are showcasing this week will be released on Friday, 5 January at 8am EST in the shop!

Thanks for stopping by 😉

©Candles in the Garden. Neat and Tangled December 2017

Merry Christmas

Hello there!

I’m over at the Neat & Tangled blog today to share a card using a combination of stencils, stamps and dies 😉

©Candles in the Garden. Neat and Tangled December 2017

I created this vibrant background using the Radiating Star stencil and some ZIG Clean Color Real Brush Pens – I simply taped down a panel of white cardstock to my work surface and then laid the stencil down on top, again securing with a bit of washitape.

©Candles in the Garden. Neat and Tangled December 2017

I picked some vibrant ZIG Clean Color Real Brush Pens and very roughly brushed through the stencil and onto the cardstock. While the stencil was still in place, I heavily misted the the panel with water until the colours started to blend and bleed. After a few seconds, I carefully lifted the stencil away revealing this awesome background, heat set the panel and trimmed down to slightly smaller than my card base.

©Candles in the Garden. Neat and Tangled December 2017

I foam mounted the background panel to the card base and moved on to the next step. Using the Stitched Slopes dies, I created a couple of snow banks – I added a touch of Tumbled Glass Distress Ink to the hill tops so that they would stand out against the vibrant coloured background. I foam mounted one snow bank straight down onto the card front and stamped a couple of sentiments from Christmas Pageant onto the other.

©Candles in the Garden. Neat and Tangled December 2017

I foam mounted the second snow bank onto the card front and then die-cut some house and tree elements using the Warm Winter Scene Cover Plate. I adhered these between the snow banks and finished with some sequins from the Snowfall Sequin Mix.

©Candles in the Garden. Neat and Tangled December 2017

I hope you have as much fun as I did combining stencils, stamps and dies!

Thanks for stopping by!

©Candles in the Garden. May 2016 Neat and Tangled post. Hexastar Stencil and Perfect Pearls.