©Candles in the Garden. Neat and Tangled NOVEMBER 2018

Hello!

Hello there!

I’m over at the Neat & Tangled blog today to share a card using the Doily Tag and Hello dies 😉

©Candles in the Garden. Neat and Tangled NOVEMBER 2018

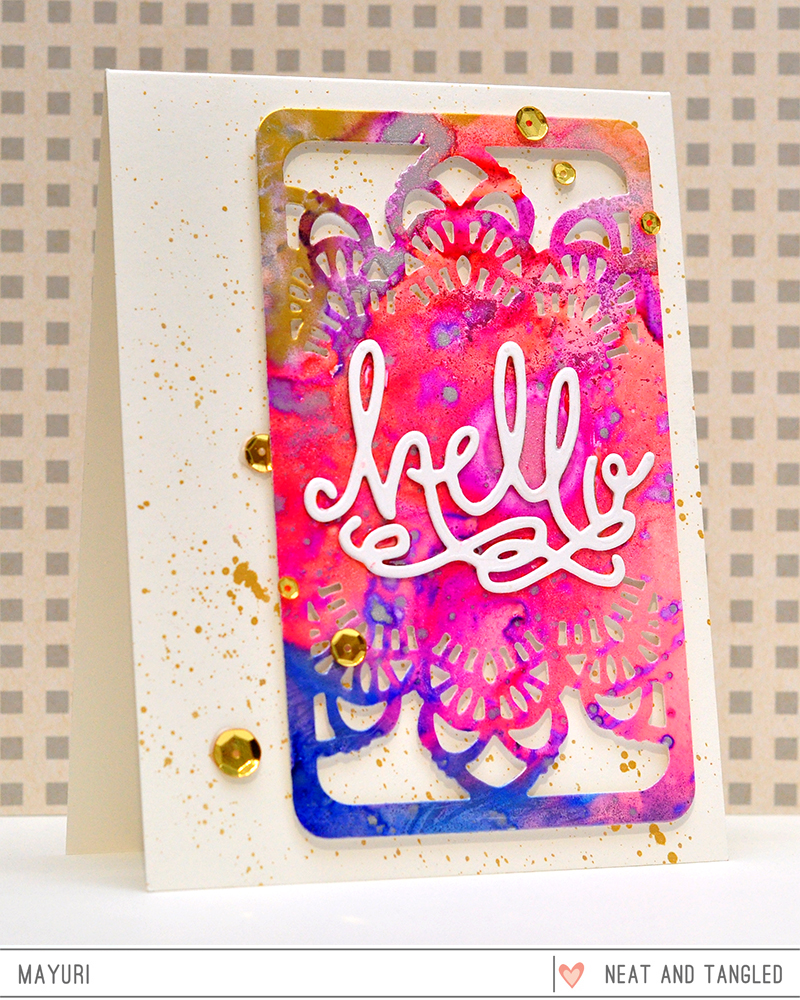
This card didn’t take too long to put together, especially as I knew I wanted to use up some of my inky panels. I die-cut the Doily Tag shape out of a bright, inky piece, popped out all of the negative bits and pieces and added some foam tape to the back, ready to adhere to my card base.

©Candles in the Garden. Neat and Tangled NOVEMBER 2018

I noticed that my card base was looking a little bare, so I added some gold paint ink splats for a bit of interest and then foam mounted the Doily Tag to the front. I then die-cut the Hello sentiment several times out of white cardstock and stuck them on top of each other to create a thicker embellishment.

©Candles in the Garden. Neat and Tangled NOVEMBER 2018

I adhered the sentiment on top of the Doily Tag and added some gold sequins to finish.

©Candles in the Garden. Neat and Tangled NOVEMBER 2018

Thanks for stopping by!

©Candles in the Garden. May 2016 Neat and Tangled post. Hexastar Stencil and Perfect Pearls.
©Candles in the Garden. Neat and Tangled November 2018 Release. Falling Stars.

Neat & Tangled November Release, Day 4

Hello there!

Today is the fourth day of the November release from Neat & Tangled, and its a beauty!

NT Release Graphic.jpg

Day 4 is for the Falling Stars stamp set and here’s my card:

©Candles in the Garden. Neat and Tangled November 2018 Release. Falling Stars.

I really enjoyed this one especially as it was so quick and easy to create! I used different coloured Dylusions inks to stamp the Falling Stars image loosely across the top half of a panel of white cardstock and then spritzed with water to make the colours blend and run.

©Candles in the Garden. Neat and Tangled November 2018 Release. Falling Stars.

I heat set the panel and trimmed to the same size as my card base and adhered straight down to the front. I also flicked on some gold ink splats for interest.

©Candles in the Garden. Neat and Tangled November 2018 Release. Falling Stars.

I stamped a sentiment from the Gift Card Box Christmas Sentiments set onto a die-cut circle piece with Versamark Ink, sprinkled with white embossing powder and heat set. I foam mounted that to the card front.

©Candles in the Garden. Neat and Tangled November 2018 Release. Falling Stars.

I added some gold sequins to finish off!

I hope you’re enjoying the November Release so far! Be sure to visit the Neat & Tangled blog to see what the rest of the DT has created – all the sets that we are showcasing this week will be released on Friday, 9 November at 8am EST in the shop!

Thanks for looking 😉

©Candles in the Garden. Neat and Tangled November 2018 Release. Stay Cool

Neat & Tangled November Release, Day 3

Hello, hello!

It’s the third day of the Neat & Tangled November release, and we are showcasing another fabulous stamp set!

NT Release Graphic.jpg

Day 3 is for the Stay Cool stamp set – here’s my card:

©Candles in the Garden. Neat and Tangled November 2018 Release. Stay Cool

I knew I wanted a textured background for the cute little character from the set to sit against and found one from my stash of inky background panels – I had used the Parquet stencil to swipe through some embossing paste onto a panel of white cardstock and added a bit of colour for interest before trimming it down to slightly smaller than my card base and adhering it straight down.

©Candles in the Garden. Neat and Tangled November 2018 Release. Stay Cool

I then stamped the little character onto another piece of white cardstock with Versafine Onyx Black ink and coloured her in with ZIG Clean Color Real Brush pens. I used the co-ordinating die to die-cut her out along with the little fish from the set.

©Candles in the Garden. Neat and Tangled November 2018 Release. Stay Cool

I freehand drew a snow hill onto another piece of white cardstock and cut it out. I used Tumbled Glass Distress Ink to add a bit of colour along the top of the hill and then stamped a couple of sentiments from the set. I coloured in the ‘COOL’ again with my ZIG Clean Color Real Brush Pens before foam mounting to the card front.

©Candles in the Garden. Neat and Tangled November 2018 Release. Stay Cool

I then foam mounted the little girl and fish to the card front to finish off!

Pop by the Neat & Tangled blog to see what the rest of the DT has created – all the sets that we are showcasing this week will be available in the shop from Friday, 9 November at 8am EST!

Thanks for looking 🙂

©Candles in the Garden. Neat and Tangled November 2018 Release. Fa La La Stencil

Neat & Tangled November Release, Day 2

Hello again!

Time to showcase some more goodies from the Neat & Tangled November Release!

NT Release Graphic.jpg

Day 2 is for the Fa La La stencil and die. Here’s my card:

©Candles in the Garden. Neat and Tangled November 2018 Release. Fa La La Stencil

The Fa La La stencil has some intricate lettering rather than large open spaces and I wanted to make sure I captured the detail on a background panel. So, I started by inking up the back of the stencil with three different shades of Dylusions Inks, spritzed with water and the laid down onto a panel of watercolour paper.

©Candles in the Garden. Neat and Tangled November 2018 Release. Fa La La Stencil

I allowed the ink to absorb into the watercolour paper for a few seconds before rubbing the stencil down onto the paper – this gave me maximum coverage.

©Candles in the Garden. Neat and Tangled November 2018 Release. Fa La La Stencil

I trimmed the panel down to the same size as my card base and adhered it straight down before moving onto the sentiment. I chose a sentiment from the Gift Card Box Christmas Sentiments set and stamped it with pink and blue inks onto a die-cut diamond piece. This piece was then foam mounted to the card front.

©Candles in the Garden. Neat and Tangled November 2018 Release. Fa La La Stencil

To then flicked on some gold paint and added a few sequins to finish off!

Be sure to check out the Neat & Tangled blog to see what the rest of the DT has created – all the sets that we are showcasing this week will be released on Friday, 9 November at 8am EST in the shop!

Thanks for stopping by 😉

©Candles in the Garden. Neat and Tangled November 2018 Release. Triangle Box Dies.

Neat & Tangled November Release, Day 1

Hello everyone!

Welcome to the start of November release week for Neat & Tangled!

NT Release Graphic.jpg

Day 1 is for the Triangle Box Dies  and Gift Card Box Christmas Sentiments – here’s my card:

©Candles in the Garden. Neat and Tangled November 2018 Release. Triangle Box Dies.

I had so much fun playing with the Triangle Box Dies, but knew that I only wanted to use the different sized triangle dies for my card. This is a very graphic, clean and simple card and you can easily use up your pattern paper scraps to create a whole card set if you like!

©Candles in the Garden. Neat and Tangled November 2018 Release. Triangle Box Dies.

I hunted round for some inky scraps along with a sheet of metallic grey cardstock and used the dies to die-cut the triangles. I looked on Pinterest for some inspiration to help me come up with a layout for my triangle cluster, and simply adhered some straight down onto my card base, while foam mounting others.

©Candles in the Garden. Neat and Tangled November 2018 Release. Triangle Box Dies.

I then stamped a sentiment from the Gift Card Box Christmas Sentiments set with Versamark Onyx Black ink.

©Candles in the Garden. Neat and Tangled November 2018 Release. Triangle Box Dies.

To finish, I added some sequins.

Pop by the Neat & Tangled blog to see what the rest of the DT has created – all the sets that we are showcasing this week will be released on Friday, 9 November at 8am EST in the shop!

Thanks for stopping by 😉

©Candles in the Garden. Neat and Tangled OCTOBER 2018

Thanks so very much!

Hello there!

I’m over at the Neat & Tangled blog today to sharing a card using a stencil, a die and a stamp set!

©Candles in the Garden. Neat and Tangled OCTOBER 2018

I began by creating a colourful background using the Cubic stencil and some ZIG Clean Color Real Brush Pens. I simple laid the stencil down onto a piece of white cardstock, coloured through the stencil and onto the card with the brush pens, and then liberally spritzed with water!

©Candles in the Garden. Neat and Tangled OCTOBER 2018

Too much water can result in a muddy mess, but not enough water means the colours don’t blend – either way, add the amount of water you feel most comfortable with! I removed the stencil and the heat set the panel quickly before trimming it down to the size of my card base.

©Candles in the Garden. Neat and Tangled OCTOBER 2018

I adhered the panel straight down to my card based and moved onto the sentiment. I die-cut the diamond shape using the diamond shaped die from Gift Card Box Die Additions and then stamped a sentiment from the Thanks So Much set. I brushed some gold ink all the way around the edges of the die-cut piece before foam mounting to the card front.

©Candles in the Garden. Neat and Tangled OCTOBER 2018

To finish, I embellished with a mixture of sequins.

Thanks for stopping by!

©Candles in the Garden. May 2016 Neat and Tangled post. Hexastar Stencil and Perfect Pearls.
©Candles in the Garden. Neat and Tangled OCTOBER 2018 Release. Nativity Play

Neat & Tangled October Release, Day 1: Nativity Play

Hello everyone!

Welcome to the start of October release week for Neat & Tangled!

NT Release Graphic.jpg

Day 1 is for a couple of cute stamp and die sets, that will be great for creating Christmas nativity scenes – Nativity Play and Angel Wings. Here’s my card:

©Candles in the Garden. Neat and Tangled OCTOBER 2018 Release. Nativity Play

I began by stamping the various characters from Nativity Play onto a panel of white cardstock, with Versafine Onyx Black ink, and then roughly adding colour with my ZIG Clean Color Real Brush Pens.

I filled in any gaps with some of the smaller stamps from the set and added a few gold watercolour ink splats for interest. I trimmed to panel down to slightly smaller than my card base and mounted it to the card front.

©Candles in the Garden. Neat and Tangled OCTOBER 2018 Release. Nativity Play

To finish, I added some copper stickles.

Pop by the Neat & Tangled Blog to see what the rest of the DT has created – all the sets that we are showcasing this week will be released on Friday, 12 October at 8am EST in the shop!

Thanks for stopping by 😉

©Candles in the Garden. Neat and Tangled SEPTEMBER 2018

Happy Thanksgiving!

Hello there!

I’m over at the Neat & Tangled blog today to sharing a card using the  Birch Leaf stamp set and co-ordinating dies!

©Candles in the Garden. Neat and Tangled SEPTEMBER 2018

I began by creating a loose watercolour background – I took an acrylic block, dropped some Dylusions Ink blots onto it and used it to stamp an image onto a panel of white cardstock. I kept the block in place to allow the colours to blend and then removed it so I could heat set the panel.

©Candles in the Garden. Neat and Tangled SEPTEMBER 2018

I sprayed a solution of water and Perfect Pearls onto my panel for a bit of sparkle and heat set once more. I then trimmed the panel down to slightly smaller than my card base and foam mounted it to the card front.

©Candles in the Garden. Neat and Tangled SEPTEMBER 2018

I die-cut the birch leaf four times out of white cardstock and adhered all the die-cut pieces together to create one thicker embellishment. I then adhered it to the card front and moved onto the sentiment.

©Candles in the Garden. Neat and Tangled SEPTEMBER 2018

The sentiment was stamped onto a strip of black cardstock with Versafine ink and heat set in white. I foam mounted that under the leaf embellishment and finished with a few sequins.

Thanks for stopping by!

©Candles in the Garden. May 2016 Neat and Tangled post. Hexastar Stencil and Perfect Pearls.
©Candles in the Garden. Neat and Tangled AUGUST 2018

Hello!

Hello there!

I’m over at the Neat & Tangled blog today to sharing a card using the Thanks So Much and Floral Frame stamp sets!

©Candles in the Garden. Neat and Tangled AUGUST 2018

This card was so simple to create, and used one stamp from each set. I took the outline diamond shape from Thanks So Much and stamped it repeatedly with Versamark ink onto a panel of white cardstock. I sprinkled with white embossing powder and heat set.

©Candles in the Garden. Neat and Tangled AUGUST 2018

I then took one of the smaller images from the set and stamped in the corners of the diamond shapes, again with Versamark ink and heat set in white.

©Candles in the Garden. Neat and Tangled AUGUST 2018

I grabbed my Zig Clean Color Real Brush Pens and scribbled roughly with rainbow colours inside each of the embossed areas. I then spritzed the panel with water and watched the colours beautifully bleed into one another, and again heat set.

©Candles in the Garden. Neat and Tangled AUGUST 2018

I trimmed the panel down to slightly smaller than my card base and foam mounted to the card front. I stamped a sentiment from the Floral Frame set onto a strip of black card stock, heat embossed in white, trimmed down and foam mounted to the card front.

©Candles in the Garden. Neat and Tangled AUGUST 2018

To finish, I adhered some gold sequins.

Thanks for stopping by!

©Candles in the Garden. May 2016 Neat and Tangled post. Hexastar Stencil and Perfect Pearls.
©Candles in the Garden. Neat and Tangled JULY 2018

Life!

Hello there!

I’m over at the Neat & Tangled blog today to sharing a card using the  Life’s a Game stamp set and co-ordinating dies!

©Candles in the Garden. Neat and Tangled JULY 2018


There’s so many ways you could go with this set, but I wanted to go clean and simple! So I die-cut the main sentiment ‘LIFE’ out of some white cardstock and set all the pieces aside. I took the die-cut panel and stamped the supporting sentiment and tiny gaming images with Versafine Onyx Black ink.

©Candles in the Garden. Neat and Tangled JULY 2018

I then took another panel of white cardstock and swiped some colour using the ZIG Clean Color Real Brush Pens, starting with a pink and finishing with a blue. I used a bit of water to blend the colours together and then adhered the panel to my cardbase.

©Candles in the Garden. Neat and Tangled JULY 2018

I then simply foam mounted the die-cut piece onto the card base, allowing the colour gradient to peek through the aperture.

©Candles in the Garden. Neat and Tangled JULY 2018

I also foam mounted the letters back into place onto the card base, and finished by adding various sequins.

©Candles in the Garden. Neat and Tangled JULY 2018

Thanks for stopping by!

©Candles in the Garden. May 2016 Neat and Tangled post. Hexastar Stencil and Perfect Pearls.